{Sharing at The Pinterest Challenge}
Showing posts with label painting. Show all posts
Showing posts with label painting. Show all posts
Thursday, October 11, 2012
painted pine cones
Looking for some fall decor that fits your color scheme? This Pinterest-inspired DIY (from Torie Jayne) is super easy and inexpensive... Just paint some pine cones and and then use them to decorate! I used pine cones from the craft store that I had in my stash; if you go the free route and collect them from nature, you'll probably want to wash them first as described here.
Thursday, May 3, 2012
painted spoons
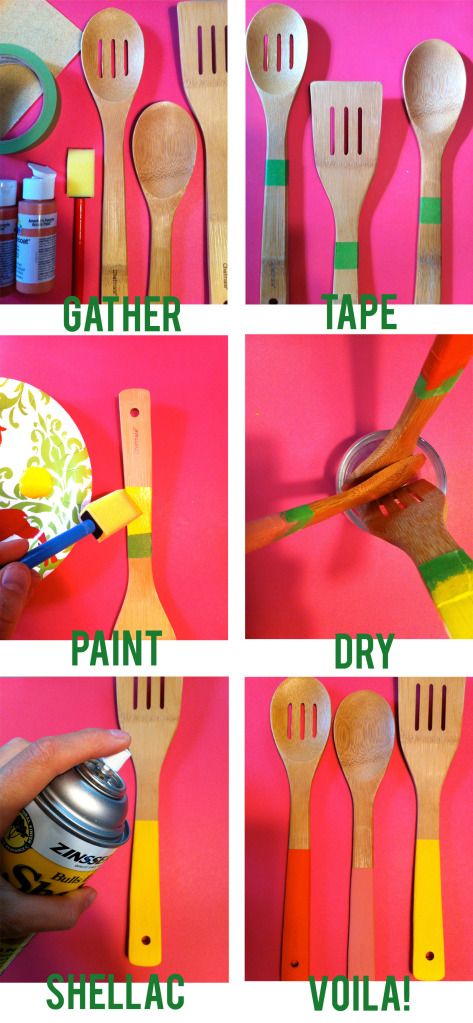
I love the dipped paint look I've been seeing all over Pinterest, from furniture legs to wooden utensils. Inspired by a tutorial from House of Earnest, I got an inexpensive bamboo utensil set from Target (under $5) and got out my stash of craft paints...
This was such an easy and inexpensive project for such great results - they'll be fun serving spoons for summer! (The shellac is non-toxic, but I still made sure not to put paint/shellac close to the end of the spoon that will touch food, and they'll be hand-wash only.) Here's the basic process:
Sharing here and:
Tuesday, December 27, 2011
holiday festivity napkins
Here's a festive holiday project that's also great for New Year's: embellished napkins, as seen on Momtastic. With metallic paints (the Martha Stewart line at Michael's has lots of great options) and a circular sponge brush, you can whip up a few of these for your holiday table in no time. To make it even quicker, I picked up some inexpensive white napkins at Target so I didn't have to sew my own.
Supplies:
Since I used regular acrylic paints, I mixed them with a fabric medium (according to the instructions on the bottle) to make sure the napkins would be machine washable. Then I just laid out the napkins on some newspaper, dipped the foam brush, and made random dots all over. I didn't worry too much about perfect coverage for each dot, but kind of twisting the brush around a little once pressed down helped get fairly even coverage. After they were dry, I ironed to set the fabric medium.
I gave these ones as gifts - they might also be great as hostess gifts - but if I were hosting anything at New Year's, I'd definitely use these for a festive table setting!
Supplies:
- Napkins (or fabric to sew your own)
- Acrylic paints or fabric paints in metallics
- Fabric medium (if using acrylic paints)
- Round foam brush (pouncer)
- Paper plate to pour paint on
Since I used regular acrylic paints, I mixed them with a fabric medium (according to the instructions on the bottle) to make sure the napkins would be machine washable. Then I just laid out the napkins on some newspaper, dipped the foam brush, and made random dots all over. I didn't worry too much about perfect coverage for each dot, but kind of twisting the brush around a little once pressed down helped get fairly even coverage. After they were dry, I ironed to set the fabric medium.
I gave these ones as gifts - they might also be great as hostess gifts - but if I were hosting anything at New Year's, I'd definitely use these for a festive table setting!
Friday, October 7, 2011
magnolia leaf wreath, take two
I really loved my ombre magnolia leaf wreath, but now that it's been up for a little while, the nice vibrant colors have really faded. The leaves are still holding up well, but it just doesn't give off the same effect with the duller browns, so I decided to give it new life with some spray paint.
I had this bronze spray paint around from a previous project and thought it would be nice for fall. With a couple quick coats and the addition of a few berry sprigs (picked up at Hobby Lobby last year), I have a whole new wreath.
looking a little blah compared to the original....
shiny & new!
I had this bronze spray paint around from a previous project and thought it would be nice for fall. With a couple quick coats and the addition of a few berry sprigs (picked up at Hobby Lobby last year), I have a whole new wreath.
Tuesday, August 2, 2011
painted placemats
In Work with What You've Got week, the first supply I've been accumulating and needed to actually start using: acrylic paints.
I had a strip of canvas left over from my floorcloth project, so I decided to use some of my paints to turn it into placemats suitable for outdoor use. I started by prepping the canvas with polyacrylic just like the floorcloth, then used stickers to mark off my design.
After rolling on the paint and peeling off the stickers, I let it dry and then did two more coats of polyacrylic.
Finally I cut the strip up into four equal rectangles, and now I've got some fun placemats to use outside (if it ever cools off enough to actually eat out there - going on a record-breaking 18th day in a row above 90 degrees around here).
Wednesday, July 27, 2011
painted floor cloth
Whichever past owner of my house redid the kitchen either had a great love for 12x12 beige tiles or got a crazy good deal on them, because they cover the floor, backsplash, and countertops. It's a bit much of the same for me, and some of the floor ones are cracked, so I've been hunting for a year for the right rug to cover up most of the kitchen floor.
Rugs for the kitchen are a bit difficult as they need to be able to handle kitchen traffic and spills. I thought an indoor/outdoor rug would work well, but normal dimension rugs don't cover up enough of my space without being too wide to fit between the counters.
So... I decided to make my own! I researched canvas floorcloths, which are basically decorated canvases coated with polyacrilic/polyurethane to make them durable - and more importantly, moppable.They're supposed to be quite durable. A pinned example:
Supplies:
Then plan out your design and paint it. I pinned this inspiration kilim rug from West Elm and marked it off by printing out diamond templates and taping around them. Or you could of course use a stencil - if I did another one, I would go the stencil route as taping this type of pattern on a 4x7 rug took forever.
When the paint has dried, apply two coats of the polyacrilic varnish. After letting it dry overnight, flip over and fold over your hem, creasing well. Apply the contact cement or double-sided tape to hold the hem, and voila, you have a rug suitable for kitchen traffic and spills.
Several good floorcloth sources/instructions:
Rugs for the kitchen are a bit difficult as they need to be able to handle kitchen traffic and spills. I thought an indoor/outdoor rug would work well, but normal dimension rugs don't cover up enough of my space without being too wide to fit between the counters.
So... I decided to make my own! I researched canvas floorcloths, which are basically decorated canvases coated with polyacrilic/polyurethane to make them durable - and more importantly, moppable.They're supposed to be quite durable. A pinned example:
Supplies:
- Heavy canvas to your dimensions plus an inch on each side for hemming - I got a couple yards duckcloth on sale from Joann's; I also read that you can find pre-treated canvas at craft stores for this type of use
- Polyacrylic
- Tape/ruler/pencil/etc. for marking your design - or if you're efficient, a stencil!
- Paints for decorating - acrylics or household latex paints both work; I went for latex because I had a lot of surface to cover
- Foam paint brush or roller
- Contact cement or double-sided carpet tape for hemming
Then plan out your design and paint it. I pinned this inspiration kilim rug from West Elm and marked it off by printing out diamond templates and taping around them. Or you could of course use a stencil - if I did another one, I would go the stencil route as taping this type of pattern on a 4x7 rug took forever.
When the paint has dried, apply two coats of the polyacrilic varnish. After letting it dry overnight, flip over and fold over your hem, creasing well. Apply the contact cement or double-sided tape to hold the hem, and voila, you have a rug suitable for kitchen traffic and spills.
Several good floorcloth sources/instructions:
- Martha Stewart
- Family Fun
- Rugmaker's Homestead
- Painting Floorcloths by Kathy Cooper (I found at the library!)
Ginger testing it out...
Tuesday, July 12, 2011
painted cushions
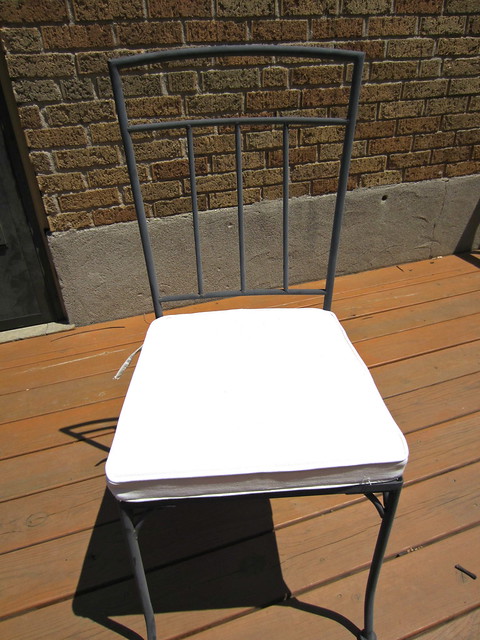
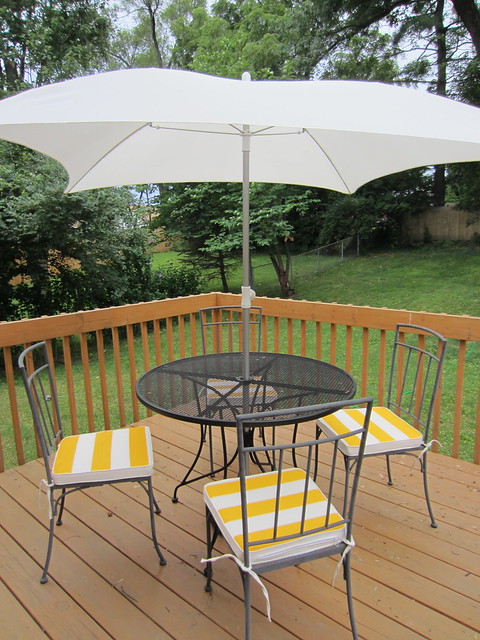
Last year when we moved in, we got an inexpensive patio set from Ikea. The price was right, but the chair cushions were a little dull... So this summer I decided to remedy that with some paint.
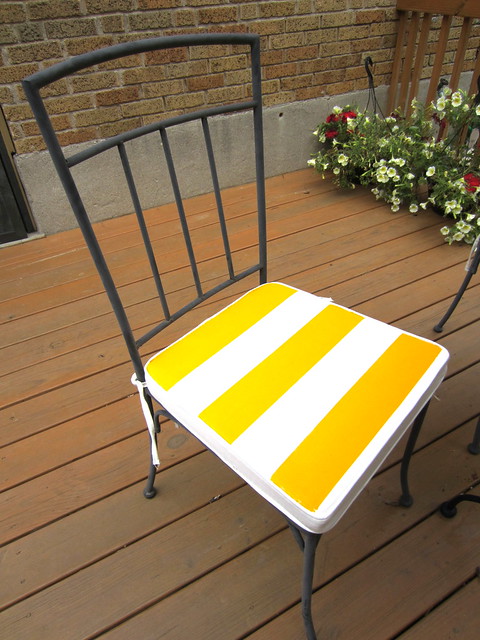
All you need to turn regular acrylic paint into fabric paint is some fabric medium - mix two parts paint to one part medium, iron to set when it's dry, and you have a washable fabric paint! I went with some classic stripes like these from Pottery Barn, in yellow - which just says summer to me.
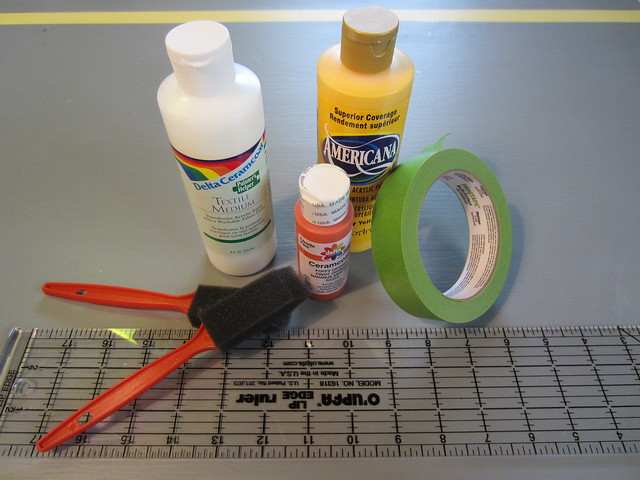
Supplies:
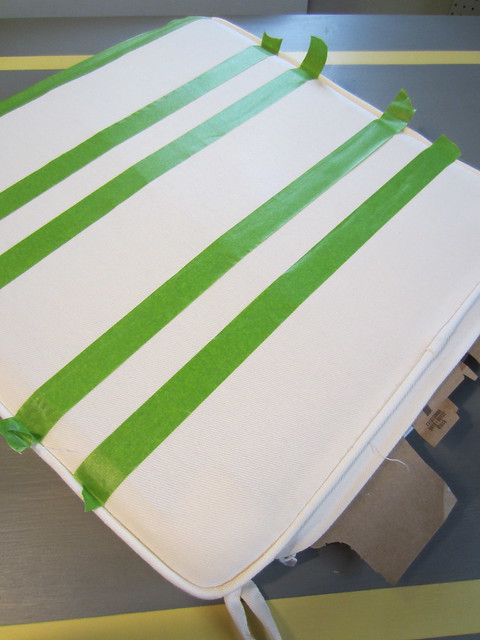
Start by inserting some cardboard underneath the cushion cover so the paint doesn't seep through, and then tape off your pattern (regular painter's tape worked well)
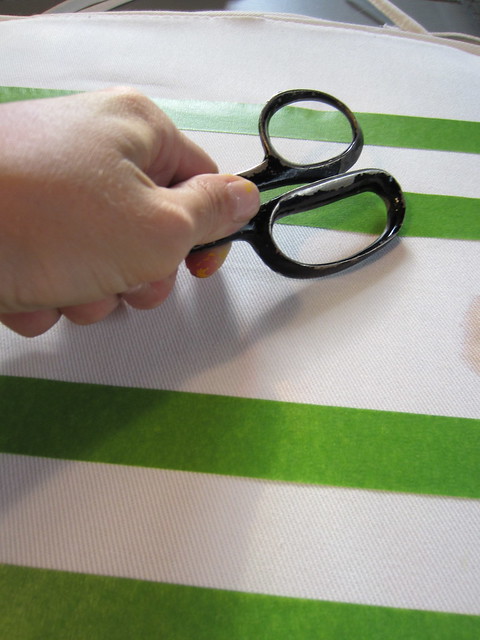
Make sure to press down the tape edge well (such as running a scissor handle along it) so you don't get any leakage.
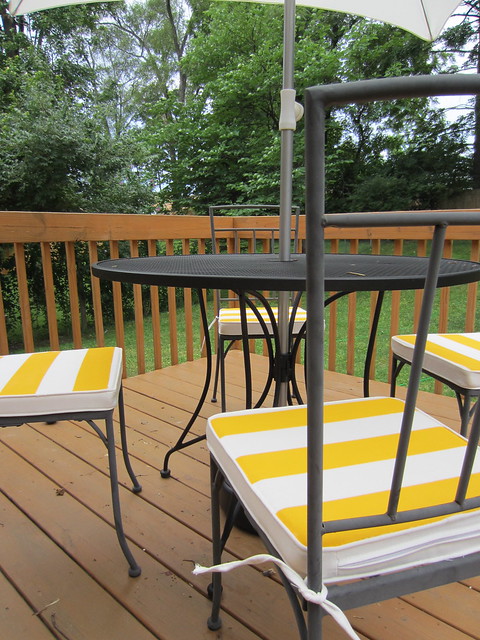
Then just apply your paint + medium with a foam brush, peel off the tape, follow the instructions on the medium for setting the paint, and voila! It's like a new patio set.
Before
After
Supplies:
- Acrylic paint
- Fabric medium
- Foam paintbrushes
- Tape
- Straightedge/ruler for marking pattern
Start by inserting some cardboard underneath the cushion cover so the paint doesn't seep through, and then tape off your pattern (regular painter's tape worked well)
Make sure to press down the tape edge well (such as running a scissor handle along it) so you don't get any leakage.
Then just apply your paint + medium with a foam brush, peel off the tape, follow the instructions on the medium for setting the paint, and voila! It's like a new patio set.
Friday, May 20, 2011
spruced up mirror
For how cheap and easy it is to do, spray painting can really work wonders on stuff that needs updating. (Like when I spray painted the tired light fixture & mailbox on the front porch for about $3 instead of spending to look like the $60+ new ones I was contemplating.)
I finally got enough break from rain around here to work a little of that spray paint magic on the $8 cracked and chipped mirror frame I picked up a while ago. Here is is before:
And here it is after a clean up and a couple coats of spray. It's certainly improved, though I didn't stray too far from the original color - I have plans to incorporate this into a frame wall and wanted something with a metallic finish for that - but I thought a bright color would be fun too. Can always change it up later!
It's currently just propped up on the bookshelves (along with my awesome new "Don't forget to be awesome" print from Super Swoon) while I plan the rest of the aforementioned frame wall...
p.s. check out some spray painting tips at the Home May'd spray paint party at Thrifty Decor Chick.... plus some other great spray paint project ideas.
Wednesday, April 13, 2011
paint makeovers - inspiration & befores
I have long admired other bloggers' painted furniture makeovers. Such as:
Pretty much everything at Life in the Fun Lane, including this dresser.
And this bench and mirror from Young House Love (lots more projects here)
Also this mirror from Little Green Notebook (see before and after, plus lots of others for this same room, here)
It takes a good eye to pick up something kinda hideous at Goodwill or a garage sale and turn it into something great. I'm working on developing that skill - but mostly on figuring out where to get the stuff! Where are all these great thrift stores anyway? The closest Goodwill we have is tiny and expensive (they're trying to go upscale - makes sense, but not a place to find cheap furniture/frames!).
But now I've got a couple items of my own lined up to refinish:
I was wandering through a furniture consignment shop recently, and while most of the items were priced higher than would tempt me for a redo piece, I happened upon this oval mirror, originally $25 but marked down to $8, presumably because of a few cracks in the frame.
I loved the frame and the oval shape, so with a few little fixes and a new coat of paint, I think this will be great for the art wall I'm working on in the living room.
And with this next one, I'm totally joining the official ranks of furniture makeover-ers: I pulled it from somebody's trash. Ginger and I were on our morning walk, and I spotted this huge frame sitting with someone's trash at the curb. Throwing out a perfectly good frame that just needs a little paint (and some new art inside), when I have a guest bedroom with no art in it?!
So I picked it up and hauled it home. Unfortunately we still had a ways to go, so my arm got a little tired...
Stay tuned for how these turn out!
Pretty much everything at Life in the Fun Lane, including this dresser.
And this bench and mirror from Young House Love (lots more projects here)
Also this mirror from Little Green Notebook (see before and after, plus lots of others for this same room, here)
And this credenza she did:
It takes a good eye to pick up something kinda hideous at Goodwill or a garage sale and turn it into something great. I'm working on developing that skill - but mostly on figuring out where to get the stuff! Where are all these great thrift stores anyway? The closest Goodwill we have is tiny and expensive (they're trying to go upscale - makes sense, but not a place to find cheap furniture/frames!).
But now I've got a couple items of my own lined up to refinish:
I was wandering through a furniture consignment shop recently, and while most of the items were priced higher than would tempt me for a redo piece, I happened upon this oval mirror, originally $25 but marked down to $8, presumably because of a few cracks in the frame.
I loved the frame and the oval shape, so with a few little fixes and a new coat of paint, I think this will be great for the art wall I'm working on in the living room.
And with this next one, I'm totally joining the official ranks of furniture makeover-ers: I pulled it from somebody's trash. Ginger and I were on our morning walk, and I spotted this huge frame sitting with someone's trash at the curb. Throwing out a perfectly good frame that just needs a little paint (and some new art inside), when I have a guest bedroom with no art in it?!
So I picked it up and hauled it home. Unfortunately we still had a ways to go, so my arm got a little tired...
Stay tuned for how these turn out!
Subscribe to:
Posts (Atom)


