Showing posts with label sewing. Show all posts

Wednesday, March 14, 2012

fabric birds

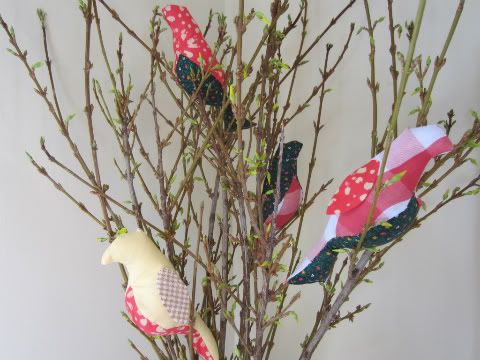
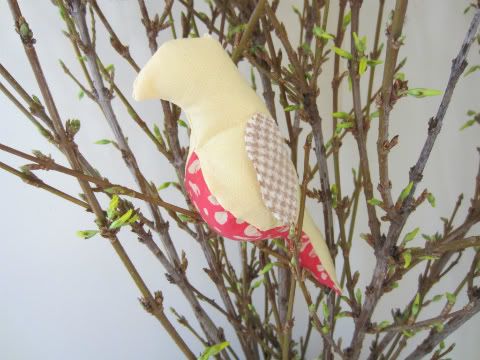
Waking up to birds chirping is one of the loveliest things about spring... which reminded me of these adorable fabric birds I pinned ages ago from Jen Loves Kev. The original idea/pattern is from Spool, and these are so fun because you can use up your pretty fabric scraps (I also picked up a few really inexpensive pieces from the remnant bin) and whip out a few rather quickly - and the possibilities are endless...
 Photobucket
Photobucket

Start by downloading the pattern from Spool (here), and follow the instructions to cut out and assemble. I picked out springy fabrics from my stash and had fun mixing and matching patterns - you can even add a third pattern/color by tacking on some wings at the end.

The instructions on the PDF download are a little sparse (for a beginner sewer like me anyway) so I did a little search for others who had made these birdies, and I found some very helpful hints/photos for figuring out how to pin the body and belly pieces together at Lou Lou's Homemade. Check there for the detailed step-by-step; here's the quickie version:


Sharing here:
Pinterest Challenge


Thursday, November 10, 2011

chair redo


Once I finished my DIY roman shade, next up on my crafty to do list was refinishing this chair icky old chair. I actually picked it up on the side of the road way back in the spring, but it took me a long time to decide on fabric... This was my first furniture redo involving upholstery, so I looked around at a bunch of tutorials, and then I just kind of had at it. Since the chair was free and looked quite terrible, I wasn't too worried about messing it up.

Before:

After:


I'm no expert in this, and you can find lots of great blogger tips and tutorials out there, but here was my general process (with links to the various tutorials that I found really helpful):
  • First I cleaned up and sanded the chair. It looked like there was originally caning under the arms, with only bits and pieces remaining, so I had to clean those out too. I unscrewed the seat and ripped off the welting and fabric from the chair back, saving everything for reference when cutting my new fabric. And nearly got carpal tunnel from pulling all those staples. Definitely a blister...
  • After priming, I painted the framewith some leftover paint from my bathroom vanity. These tips from Little Green Notebook were helpful for getting a nice coat. 
  • And then it was time to tackle the cushions. I picked out this Waverly fabric from fabric.com - it was hard to know how much to order, but I guesstimated based on the cushion size and ordered extra so I could make cording.
  • For the seat, I probably should have sewed to get the front corners just so, but I decided to fudge it a little and just staple the fabric into place. Stapling fabric around the curve was a bit tricky, but the back part of the seat isn't visible when it's in place, so I could hide any folds back there.
  • Then I made a new back with some batting (since the original was tufted, so the old cushion didn't work so well any more) and stapled into place (Little Green Notebook tips here). I cut off the excess and then hid the staples with double-cord welting.
  • I made the welting following Little Green Notebook's instructions here (also referenced Centsational Girl's post here) and then glued it on. 
It could be a little more professional looking, but it was my first chair - and a really cheap project (only had to buy fabric) - so I'm pretty pleased with the new chair in the corner of my bedroom. Now just need to hang the curtains and art, and I'm pretty much done with the room as envisioned on my mood board!


Sharing here.

    Tuesday, October 11, 2011

    elastic waist skirt

    I did it! I sewed my first wearable item, only 9.5 months after getting a sewing machine (well, I did make this bow t-shirt, but that was really just an embellishment). I've had an a-line skirt in the works for a while, but I'm kind of terrified of the zipper, so I decided to try an elastic waist one.

    There are lots of tutorials out there, way better than this beginner could put together, so I won't attempt a full one. I followed this one from Freshly Picked, through the hem sewing step. I didn't want the elastic to show on my skirt though, and I thought a paperbag waist would be fancy - so I read a few more tutorials for ideas and after sewing the hem I switched to the waist/elastic steps from this tutorial at Adventures in Dressmaking. 
     in process
     the result


    The results aren't exactly perfect, but it's one step on the way of learning to make myself a skirt... If you're a super beginner like me, a few tips from my experience:
    • Remember that this is practice: Use inexpensive fabric for your first project (Joann's and Hobby Lobby have big sales and coupons; I got mine at Fabric.com for about $5 a yard and free shipping) to take the pressure off of making this perfect. It's okay if it doesn't turn out! You're practicing (I told this to myself a lot).
    • Research: Read lots of tutorials - even if you're planning to follow a specific one, looking at a bunch will help clarify steps you might be unfamiliar with. I used the two above, plus this one from What Would a Nerd Wear and this one from Heart of Light.
    • Don't get ahead of yourself: Keep the tutorial handy so you do the right steps in the right order. Even with the iPad handy for viewing the tutorials, I still sewed one side too early and had to improvise. Whoops.
    • Be flexible: While wearable, the skirt was way too square to be flattering on me at all, so I used it as an opportunity to practice alterations... I've seen people take in too-big skirts and shirts by just sewing a new seam - so I folded it inside-out and pinned a line down from the waistband about an inch in. It meant I had to lose the pickets, but it's just practice, right? Then I cut off the extra material, and now I have a straighter and (at least slightly) more flattering skirt.
     

      Thursday, June 9, 2011

      pompom trim scarf

      Everybody's talking about Pinterest lately, and I've wholeheartedly joined this bandwagon (my pins here). I previously had a completely unwieldy online bookmark list of ideas, but now I can stick them on my virtual pinboards - it's much more convenient & fun to keep track of these things with pretty pictures!

      Now I'm developing quite a visual collection of projects to do, so it's time to start doing some of them. First up, this adorable DIY pompom scarf I pinned from What I Wore.


      I followed her tutorial to turn this fun & flowy clearance rack fabric into a scarf. As a bonus, I finally had an excuse to buy some of the adorable pompom trim that I always eye at Michaels...


      I'm pretty pleased with my new summer scarf - though this was supposed to be a really quick project... and in my beginner sewer-ness I didn't really think about how this fabric wouldn't want to have a nice fold ironed into it. So it was a bit difficult to work with but still turned out cute as long as no one looks too closely. Plus with my clearance row fabric and coupon on the trim, it was slightly cheaper than buying a scarf PLUS gave me sewing practice (my new excuse for spending money at the craft store).


      Linking here

      Sunday, April 10, 2011

      felt easter baskets

      Recently I came across these adorable felt buckets for Easter at Target. They're only $2 apiece, but with my burgeoning sewing skills and the remnant bin at Joann's, I figured I could make three of these for even less.

       Target's
      Mine

      Supplies:
      • Felt
      • Fabric stiffener
      • Sewing machine
      • Flower pot or small bucket for template
      • Paper/tape/scissors to make template
      • Fabric glue
      • Embellishments (ribbon, felt, embroidery thread, etc.)

      To start, you need to make a template. I came across this idea from Make It and Love It: tape two pieces of paper together and wrap them around your flower pot/bucket prototype. Fold the edges around the bottom/top and mark the edges. After you remove the paper from around the pot, cut along the lines, and you'll have the template. You also need a template for the base - trace around the bottom and cut the template about half an inch bigger around. You can make the handle however long and thick you like...

      Start by folding the bucket piece in half (inside out), pin, and then sew close to the edge. Then flip it and press the seam flat, and you've got your bucket shape.

      At this point I painted on some fabric stiffener with a foam brush to make it a bit sturdier. Once my stiffened bucket was dry, I applied some fabric glue around the inside of the bottom and placed the circle inside.

       Once that set, I attached handle (which I had embellished with ribbon & fabric glue).
      And while the above were drying/setting, I cut some egg shapes out of another felt color and decorated them with some embroidery thread. These got glued on with fabric glue at the very end.

      End result - three cute Easter baskets for about $2  - that was just the cost of my remnant piece of felt since the rest I dug out form my craft stash (aside from the fabric stiffener, but I was planning on buying that for some other potential projects anyway). That means a savings of $4, which means more candy to put inside!

      Friday, April 1, 2011

      t-shirt refashions

      Since I'm kind of into shirt refashions/embellishments lately, here is a roundup of some great ones I've seen, for those unused tees, tanks, and cardigans you have around.
      1. Pleated tee (Anthropologie inspired) from Welcome to the Good Life
      2. Sequin striped boatneck (J. Crew inspired) from Welcome to the Good Life
      3. Striped bow tee (Anthropologie inspired) from Welcome to the Good Life
      4. Ruffled bib tank (Ann Taylor Loft inspired) from Ruffles and Stuff
      5. Bow tee from I Still Love You
      6. Lace strip tee from iCandy Handmade
      7. Ruffle flowered top from Welcome to the Good Life
      8. Embellished tees (corsage tee, ribbon necklace tee) from Academichic
      9. Tank dress (adding a skirt to a tank) from Academichic
      10. XXL tee skirt (simple skirt from a men's tee) from I Still Love You

      Store offerings seem to be great places to get inspirations - here are some currently available DIY-able items I came across:
      1. Neck/pocket trim tee from J. Crew - I saw this one in the store (couldn't find online) and thought it would be easy to mimic by sewing ribbon on a tee.
      2. Wrapped up top from ModCloth - add some lace trim and a bow to a scoopneck tee
      3. Gris sur gris top from ModCloth - make a ruffle (see how here) and sew it onto a similar hued tee.
      4. Girls' sequin necklace tee from J. Crew - fabric glue plus sequin trim/ribbon on a stripey tee.

      Monday, March 28, 2011

      striped bow tee

      Recently I saw this adorable striped bow top from Spool No. 72 via The Daybook.
      Then I saw this tee on sale for $5 at Old Navy and this bow tee tutorial on I Still Love You in close succession.

      Clearly this was DIY destiny.I followed the tutorial from I Still Love You along with this one at Blue-Eyed Freckle (because I'm a beginner sewer and need all the help I can get!) to make a bow out of a second (identical) t-shirt and attach it to the unadorned $5 striped tee. And now I have this fun knockoff!


       linking here.

      Visit thecsiproject.com

      Sunday, March 20, 2011

      squeaky peep toy

      Turns out Ginger loves stuffed toys with squeakers. Her form of love looks like the following:
      I spend a lot of time picking up bits of stuffing around the house...

      Since she goes through these things so fast, I decided to recycle the plastic squeaker thingies from inside of them and make her a couple new ones. And when I saw this cutest-thing-ever peep bunting from Made, I had a perfect shape for Ginger's first homemade toy.
      Photo from Made's bunting tutorial...I think this is my next project
      Supplies:
      • Peeps bunny template (from tutorial link above), enlarged to desired size
      • Fabric (probably tougher is better, but I went to the remnant bin and couldn't pass up 50 cents for this one)
      • Squeaker recycled from old dog toy
      • Stuffing
      • Sewing machine
      And okay, I'm not even going to attempt real tutorial instructions on this one - I got a sewing machine for Christmas and finally today had the mental fortitude to figure out how to wind a bobbin and string the thread through the crazy configuration necessary to sew... so this is my very first project.

      Thus I don't really know what I'm talking about when it comes to sewing, but basically you sew the little bunny like it's a pillow - do it inside out, leave a little hole so that you can stuff it once you turn it right side out, and then stitch. I added the eyes with a brown sharpie.
      I sewed something without mom supervision!

      I'm not sure whether, after figuring out how to set up the sewing machine without too much difficulty, I was being cocky or stupid in picking a shape with this many curves. Turned out slightly wonky, but seeing as how I was just going to hand it over to be chewed, it was a good practice piece.

      Friday, November 5, 2010

      if I had a sewing machine...

      ... I would make these things right now:

      Napkins from the Purl Bee
      Wool felt pot holders from design*spongeRuffle pillow from Jones Design Company
      Oak leaf bowls from Martha Stewart

      Okay, so there's maybe another wrinkle aside from not having a sewing machine - I'm not really a sewer either. But with my rudimentary skills, I'm sure I could handle the first two. And work my way up to the others. And with a dedicated craft area, this seems like a tool I should have, doesn't it? Hmmm ... Christmas list maybe.
      Related Posts Plugin for WordPress, Blogger...